Sunday, March 2, 2014

How to Turn Off Your Mac's Volume Pop Sound with a Click

When you hit the media keys to change the volume in OS X, you get a pretty obnoxious popping sound so you know about what level your sound is at. This might be helpful the first time your turn on your computer, but it's pretty annoying in the long term. Thankfully, Cult of Mac points out that it's super easy to turn off in most versions of OS X.
 All you need to do is head into your System Preferences and click the "Sound" option. On the "Sound Effects" tab, uncheck the box "Play feedback when volume is changed." Now, when you change your volume with the keyboard you won't hear those popping sounds anymore. If you're looking for a more temporary fix, just hold down the Shift key when adjusting the volume.
by lifehacker.com

Tuesday, September 3, 2013

10 Apple Mac OSX Tips [iFix-OSX]


  1. Starting apps using Spotlight: If there’s an app I need to use that’s not in my Dock, I start it by hitting Command + Space to open the Spotlight search box, then I begin typing its name. After just a few characters Spotlight has usually realised which app it is, and I just hit Return to start that app. Simple, and quick. No mouse required!
  2. Quick Look everywhere: With OS X Lion Apple extended the Quick Look functionality to just about every aspect of OS X. You can hit Space to Quick Look items in a Stack, or in the print queue window, or in Mail, and so on (in Mail, the best technique is to click once the file attachment you want to Quick Look and then hit Space; clicking and holding the mouse before hitting Space also works for me).
  3. Quick open files: To open a file you’re currently Quick Looking, just double-click anywhere on the Quick Look window.
  4. Paste without formatting: I don’t know about you, but I never, ever want to paste something into a fresh document AND carry across its original formatting. To paste without formatting (i.e. as plain text), hold down Shift + Option + Command and hit V. It’s a tricky keyboard combo to master, and I hold down Option + Command with my thumb, and Shift with my pinkie, leaving a finger free to hit V.
  5. Open a link in a new tab: If you’re using a standard PC mouse that has a scroll wheel, you can click the scroll wheel while hovering over a link in the browser (or in Mail) to open the link in a new tab. For what it’s worth, this works on most operating systems, not just OS X.
  6. Uncluster apps in Mission Control: When using Mission Control, scrolling in the usual way on a touchpad or mouse (i.e. using the mouse wheel) causes the windows the cursor is hovering over to expand so you can better see their contents.
  7. Drag and drop the proxy: Let’s say I’m viewing an image in Preview and decide I want to edit it in Photoshop. I could open Finder and navigate to the file, before dragging it to the Photoshop icon in the Dock, but here’s a quicker way: just drag and drop the proxy icon onto the Photoshop icon in the Dock, which will then instantly open the file in the new app. The proxy icon is the little icon to the left of the filename in the titlebar. If the icon is greyed out, it means the file hasn’t been saved; this drag-and-drop trick won’t work until the file is saved.
  8. Use text clippings: If there’s some standard text I use all the time (such as a personal biography), I write it in TextEdit, then highlight all of it, and click and drag it to the desktop or to a Finder window. This creates a ‘clipping file’ containing the text (and like any other file, you can Quick Look a clipping by selecting it and hitting Space). If the clipping file is then dragged and dropped onto a new document (or any app that accepts text, like a web browser) then the text will be inserted at the cursor position.
  9. See other menu options: If you open any menu that run along the top of the screen, pressing and holding any of Shift, Option, Command or Ctrl (or any combination of these) will show what other options are available. Give it a try! Often this is a way of uncovering useful program features.
  10. View the desktop: To quickly move all the windows out of the way so you can see the desktop, hold down Command and hit the Expose shortcut (usually above F3).


Thursday, August 15, 2013

iOS 7 Makeover for iCloud.com Beta

Here is the new Look at the iCloud having its iOS 7 Make over.
All the Pages have been changed to match the iOS 7 look, below you can find screen shots from some of the pages that i have taken. sorry I cant put all the pages due to privacy reasons.
iCloud Beta iOS  iCal View
 The new redesign brings in whole new web browsing experience from smooth text to colorful graphics blurred animated HTML 5 back grounds and  of course the simple dynamic layout. Let me know your comments and views on the new design by replying on the comment sections.
Beta login address https://beta.icloud.com


iCloud Beta iOS 7 Login Page

iCloud Beta iOS  Navigation

Thursday, August 8, 2013

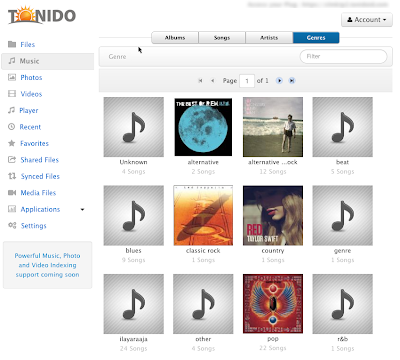
Build your own cloud storage with Tonido and stream your own Music, Video and Documents


We all know that iCloud, Google, Dropbox and Amazon offers cloud storage but they all cost you and have limitations from storage, upload file size, unsupported files.
 Here is the good news Tonido is free could service that you install to you Mac, Pc or Linux computer and it turns your personal computer storage to a cloud storage where you can access your data from anywhere on any time using worlds top mobile OS like iOS devices , Android, Windows Mobile and BlackBerry. All this come with hassle free No Uploading. No Storage Limits. No Security Worries.

The best thing I like about this service is that I can have all my music and video be streamed to any of my mobile devices i own. This helps me to save space on my iPhone and iPad and also access all my content without limitation. All the streaming is supported over LAN, WIFI And yes over your mobile carrier 3G or LTE.

The most awesome thing is that all this comes at not cost at all. Both the client and mobile apps are free. Go grab it and enjoy your own cloud.
Download


Monday, June 24, 2013

iOS 7 Beta 2 is available for download over the air.

Ok for all of you who have update to developer iOS 7 Beta here is good news. There is an over the air update to iOS 7 Beta 2 available to download as i right this article. go ahead and grab it. its available in all countries.

How to share your mobile broadband internet connection using Mac's built in airport wifi

Ok I know that there are plenty of portable wifi routers out there where you could just plugin in your USB mobile broadband stick and start sharing your connection while on the road, camping or at a boring seminar where there is no free wifi. But why spend money when you can do it for free using you excisiting Mac's airport. Your friends and colleagues will love you when you surprise them with sharing your internet connection with them (for free of course)

Here are the steps.

1.Make sure your mobile internet is plugged in and working.

2. Go to system preference - Sharing
Inside you will find on the service list -Internet sharing. just highlight it but don't tick the box. once highlighted you will see that the internet sharing is set to off, at this point its ok because we need to select the connection and adjust the settings before we turn on the the internet sharing. from the 'Share your connection from drop down list choose you already connected USB mobile broadband connection. in my case its 4G LTE. Then select how you want to share it To computer using section,  we want to share it over Wi-Fi so go ahead and select it.

3. Next big step - Setting Wi-Fi Option
Click on the Wi-Fi Options tab - Give your sharing network a name, in my case its ifix-osx. Then choose a channel  from the drop down list, don't select the channel 1 if you are in a wifi crowded area and want to avoid interference because most routers default to Channel 1. 
Next is Secuity , You have the option to leave the connection open but I advice you to make it secure for your own safety.  Here its best to to choose WEP because its compatible with most devices but if you and your sharing partners all have Apple devices its ok to go ahead with higher security option.
Then give it a password and click ok . your are almost done.

4. Tick the box next to Internet Sharing.
Once ticked you'll be prompted with the above dialog, Click start.


Now you can see the Internet sharing is On. just to make sure its all working go ahead and look at the status bar at the top right corner to see if you can see the airport wifi icon changed in to a arrow pointing upwards. If you can see it , you are all set.

Just ask your friends and colleagues to search for your shred network over wife and give them the password.

Hope you got this OSX fix. if you have any questions or comment just drop it in down at the comment section.